
Since some wood will have both light and dark areas it is up to the intarsia artist to select your colors. Keep in mind you want contrasting colorsand values…. if you keep to one color/species of wood your piece will turn out monotone and dull. This will make your piece pop. Highly figured and grained wood can add a lot to your piece as well. I strongly believe a good intarsia piece must have a variety of contrasting shades of wood ranging from white to black. Your choices will depend upon the color variance in each individual piece of wood. Try to get pieces of wood with several shades in it, then for example you can use a piece of sycamore with light and dark streaks for the light and medium light areas. There are many woods to choose from domestic to exotic. A good way to determine which woods will work best for your project is to group varnished wood samples together and see how the colors, values, and lights & darks work together. I paint one half of my samples with varnish and leave the other natural so I can see the true finished color. Lay out wood samples onto your pattern and step back and see how the colors stand up at a distance…. that is how you will be viewing the finished project.
Here is the legend I use in my patterns for the shades of wood and some suggested woods for each letter. See what is available in your area.
W- White : Aspen, Poplar, Holly, Basswood
L- Light : Aspen, Poplar, Maple, Elm, Ash, Pine, Sycamore, English Sycamore
ML- Medium Light: Maple, Ash, Beech, Birch, Cedar, Oak, Butternut, Sycamore
M – Medium: Cherry, Beech, Hickory, Oak, Cedar,
MD- Medium Dark: Cherry, Beech,
R- Reddish: Aromatic Red Cedar, Redwood, Bloodwood, Rosewood, Mahogany
Y- Yellow: Yellowheart / Satinwood, Yellow Pine
D- Dark: Black Walnut, Very Dark pieces of Western red cedar, Rosewood
B- Black: Ebony, Wenge. Mostly just for eyes or you can burn or stain the eyes
Check your wood for interesting grain patterns and knots. Avoid using many pieces of wood in the same project that have a lot of light and dark variations, example: Zebra wood. Only use it for special attention areas. If it is used in too many areas on one piece, it will just detract from your overall design by making your eye go straight to those parts and not to the entire piece. Sky and Water are great areas to use a spalted, burled or highly figured woods. Other great places to use this type of wood are ground areas and feathery or furry texture areas. Use the grain to your advantage, even if it means using only a small section of a larger board.
There is some debate as to whether you should alter the wood with stains, ebonizing, dyes or paint. Some intarsia purists feel that you should never use stains or dyes. Although I prefer to use natural colored woods in most all of my intarsia art, sometimes an intarsia piece requires an area of an unavailable or impossible to find color. For example: The head of my turkey needed to be blue to really look like a turkey. I applied a light wash of blue acrylic paint on top of the bird’s-eye maple to get the light blue color I needed.
You must think of the finished artwork; ask yourself, will using stains/paints enhance your piece? After all, using white gel stain on white wood is widely accepted by many who don’t believe in using stains or dyes. I fail to see any difference in using washes or dyes on your pieces, as long as you allow the beautiful wood grain to show though as much as possible. Using stains and washes allow you to use available woods without the expense of the exotic woods. Some woods can darken or lighten with age. If I want to keep my Black Walnut very dark over time, I will use a Dark Walnut oil on it to preserve and enrich the lovely deep brown color. I always use a white gel stain on my white pieces in order to keep the white wood from turning brown with age or yellow with varnish. I believe it is up to the individual intarsia artist to decide whether or not to use dyes, stains or paints.
Yes, I do design custom patterns. I can create a special custom order pattern of a dog or other pet from your photo or from my own reference material. The cost of a custom pattern is $90. The $90 fee is non-refundable and covers the time it takes to produce the pattern. Kathy Wise Designs Inc. owns all copyrights to any custom patterns and may sell reproductions. There is an extra charge for patterns over 14 inches. For more information on custom pattern orders, please send an email at kathywise@bignet.net , write me at Kathy Wise Designs Inc. PO Box 60, Yale, MI 48097, or fax your request to Fax #: 810-387-9044
As long as you are not mass producing the projects, you can sell them to friends, family and customers. If you are interested in producing them in a large amount for commercial sale, you must contact Kathy Wise kathywise@bignet.net to get legal permission. Otherwise it is a copyright infringement and may result in legal action. You may not have copies of any of Kathy Wise Designs patterns made and re-sell them or alter and resell them to others.
You can have up to 10 copies made at a time. If you use the copy and paste method you will need 6 or more copies per project. You can not sell any of your pattern copies to others. Support your pattern designer! When you make a project, give the designer credit for furnishing the pattern. When someone asks about a pattern, tell them where you obtained it from, do not just give them a copy. When someone asks for a pattern on a web site, tell them where to get it, don’t just give them the pattern.
I use my Pneumatic Drum Sander for 95% of all my sanding. Because it has an air filled bladder inside of a canvas sleeve covered by sand paper, it will give slightly when you push your wood against it. This enables you far more control over shaping and is faster than a belt sander, oscillating sander and other sanding methods. I always use rubber finger tips to protect my fingers from being sanded as well. My sander has two drums. I put 120 grit sandpaper on the bigger 8″ drum to remove wood quickly. The other drum is 2” and I have 180 to 220 grit on it to remove the rougher scratches and put a nice finish on the pieces. I will sand pieces as small as 1/4″ by 1/4″ by using pliers or tweezers to hold the pieces. For inside or hard to reach edges I will use an air grinder or Dremel tool with a 1/4″ or 1/2″ sanding band (drum). It puts a nice smooth finish on the wood before I move on to the sanding mop. You can use any type of sander that you have, but the drum sander is the easiest.
You can hand sand every piece or use a sanding Mop. I love my sanding Mop; it saves so much time and works with so little effort. You get a beautiful polished finish in an instant. I have two mops mounted on a variable speed grinder. Variable speed is almost a must because some wood will burn at the higher rpms. I use the 120 grit mop first and then move on to the 220 grit. The rougher grit will take sharp edges off the wood which can save some sanding time. One of the very best tools in my shop! Contact Klingspor at www.woodworkingshop.com to get one.
There are several different types of blades for the scroll saw.
Reverse-tooth blades: 5 – 7 teeth at the bottom are reversed and leave a clean edge on the bottom of your piece.
Skip- tooth blades; every other tooth is eliminated, helps to remove the chips more effectively.
Regular-tooth blades: teeth are all in the same direction, will leave a burr on the bottom.
Use a #3 or smaller blade for pieces with sharp turns or small details and for soft or thin wood. . Use it for cutting larger sections into smaller pieces, it will have a smaller kerf (amount of material that is cut away) and your pieces will fit together better. Use a #5 or #7 for harder / thicker wood and for cutting outside edges (edges that will not be fitted next to another piece). Your best bet is to get a large variety of different sizes and types and try them out on your wood. Every intarsia artist has a favorite blade. I like the Pegas skip-tooth blades for their ease of cutting through hard thick woods, but I will switch to a reverse-tooth blade for luan , fretwork or thin wood stock. Go to my website to buy these great blades.
The definition of Ebonizing is “to stain black in imitation of ebony (Circa date: 1828 from the Merriam-Webster dictionary). There are several different ways to ebonize a piece of wood: staining it with black stain , using India ink, using black shoe polish, using black permanent marker or by using a mixture of common household ingredients. I like the chemical Ebonizing method of a solution of vinegar and ferric nitrate powder on 16 different species of wood. It will cause a chemical reaction that changes the color of the wood when soaked or brushed on. You can use any of these three different types of iron & Vinegar solutions ( Rusty nails, steel wool and ferric nitrate)
* Ferric Nitrate 1/2 teaspoon & 1 cup vinegar: The ferric nitrate solution works the fastest and darkest without having to soak in vinegar for an extended time. It is easy to control the intensity of the black by adding or subtracting the amount of ferric nitrate you add to the vinegar. Iron(III) nitrate, or ferric nitrate, is the chemical compound with the formula Fe(NO3)3.
* Rusty nails & 1 cup of vinegar: Let set a few hours or a day, longer it sets the more intense the color. The degree of rust on the nails effects the color as well.
* Steel Wool & 1 cup of vinegar: Cover the steel wool completely with the vinegar. Let set a few hours or a day. It also gets darker as it ages. The steel wool tends to break down and leave particles in the solution. Strain the solution before applying.
Woods which are high in tannin acid such as walnut and oak seem to work best for a very black finish. Tannin acid which is found in tea also helped to intensify the black effect on other woods. Maple and Ash will turn a light gray.
For a nice flowing contour, you will want to sand some pieces together as one (for example: the neck of a horse). Then you can take the pieces apart and sand each piece a bit more. My favorite method is to use Instant T Glue (CA) …it is very fast and easy. I use it 90 % of the time. Put two or three small dots of instant T Glue on one side of your two pieces. Spray with accelerator and fit back together on top of a very flat surface covered with wax paper. As you are holding it together, twist it as it dries. Twisting will prevent it from sticking to the paper. It will only take about 15 seconds to dry completely so you have to work quickly. Add on other parts one at a time. Now your piece is glued together and you can sand the contour you wish. To take the pieces apart, simply rap the pieces on a hard surface and they will break apart. If you can’t break it back into two pieces easily, you used to much glue and will have to re-cut it apart. Don’t breath the fumes as you cut. Practice on some scrap wood before you try it out. Small, fragile or delicate pieces ca not be used with this method. Once you get good at using the glue method you may never make another shim.
Tack or Pre-Glue pieces together before you glue to your backer board.
I use CA glue to tack the pieces together on many of my projects before gluing to the backer board. Lay the pieces in place on your pattern and glue them one piece at a time, putting them back in place on the pattern. For larger projects, divide it into a few smaller sections and glue them together.
Another good method is using 100% silicone glue (same as the clear caulk in a large tube) to tack the pieces together before final gluing. Lay the pieces on the pattern and tack the sections together with two or three small dots of silicone, taking care to follow the pattern carefully. Don’t put on too much glue, you don’t want the silicone pushing up though the seams. Let dry overnight. Now when you glue your piece to the backer board with wood glue, your pieces will stay in the correct place. If you have to break it apart to adjust a piece, it will do so easily.
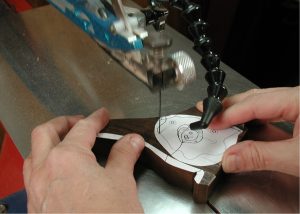
There are several methods for laying out your pattern onto the wood. You will have to decide which method you like to use the best.
Copy and Paste: Make several copies of your pattern pieces and spray adhesive to adhere the copies to the wood. . You can also cover your board with clear packing tape & then stick the pattern on top.
Carbon paper tracing: Using carbon paper under your pattern, trace each piece onto the wood.
Trace edges and fit: After each piece is cut, lay it next to the adjoining pattern piece and retrace your cutting line for a tight fit.
I like the Copy and Paste method because I believe it is faster and easier than other methods. You will have to decide for yourself which method you like, whatever works best for you. First I make several copies of the pattern, up to 6 or 7 depending on how many pieces. Then cut apart each piece and group into colors. You can mark each color group pattern piece with a specific colored marker to make it easier. I spray the back of the pattern pieces and adhere to the shiny side of Contact Brand contact paper. Cut the pieces apart. Peel and stick your pattern pieces to the wood. The reason I like using the pattern glued to the contact paper is it will peel off easily without leaving a gummy glue residue on the wood. It also lubricates the blade and helps prevent some woods like cherry from burning when you cut. I often change my mind when positioning patterns on the wood and I can peel off easily and reapply. Always pay attention to the grain direction on the pattern. You can also use a Xyron machine which will stick your pattern to a roll of peel-able adhesive backed paper. Go to your local craft store to find them.