Great books by Kathy Wise to learn the process of Intarsia
“Intarsia Woodworking Projects” is a great book for beginners as well as advanced woodworkers. Intarsia enthusiasts can get right to work with this array of more than 21 full-size patterns suitable for a wide range of skill levels. It features 3 step by step tutorials, one each for beginner, intermediate and advanced projects.Displaying an artistic style of woodworking that focuses on nature, the outdoors, and nostalgic scenes, these full-size patterns—bound into a pocket at the back of the book, no photocopy scaling necessary—include whimsical holiday animals, a classic rose, colorful lovebirds, a lighthouse scene, and a farm scene. A brief, getting-started section provides hints on which types of wood and blades to select as well as how to shape pieces, guiding those new to intarsia or serving as a quick refresher for more seasoned crafters. The rose pattern in the first tutorial is very easy and fun to do and it is a good place to start for a beginner. The price is $24 US. and $42 Canada including shipping.
Intarisa Woodworking for Beginners is not just for beginners, don’t let the title fool you. This book has over 23 assorted patterns starting with several very basic beginner lessons & ending in exciting intermediate projects. A must have addition to your Intarsia library for woodworkers of all skill levels!The price is $24 including shipping for US & $42 Canadian shipping.
Intarisa Birds: Woodworking the Wise Wayhas 30 Bird Patterns for Beginners to Advanced Woodworkers. It has beautiful photographs and multi-views of each bird project, along with four easy to advanced step by step projects which clearly explain the t echniques for creating realistic Bird Intarsia projects. The Wood, Tool and Supply sections have lots of helpful reference information. Chapter One: Basic Intarsia Steps, will provide hints as how to shape feather and wing pieces, gluing and finishing, and how to inlay small pieces, guiding those new to intarsia or serving as a quick refresher for more experienced woodworkers. Patterns include : Eagle, Peregrine Falcon, Robin, Great Horned Owl, Macaw, Turkey, Crow, Screech Owl, Swan, Loon, Barn Owl, American Kestrel, Hen, Rooster, Quail, Pelican, Red-tailed Hawk and many others. The price is $24 including shipping for US & $42 Canadian shipping. Click to BUY NOW
How to transfer the pattern onto the wood
There are several methods for laying out your pattern onto the wood. You will have to decide which method you like to use the best.
Copy and Paste: Make several copies of your pattern pieces and spray adhesive to adhere the copies to the wood. . You can also cover your board with clear packing tape & then stick the pattern on top.
Carbon paper tracing: Using carbon paper under your pattern, trace each piece onto the wood.
Trace edges and fit: After each piece is cut, lay it next to the adjoining pattern piece and retrace your cutting line for a tight fit.
I like the Copy and Paste method because I believe it is faster and easier than other methods. You will have to decide for yourself which method you like, whatever works best for you. First I make several copies of the pattern, up to 6 or 7 depending on how many pieces. Then cut apart each piece and group into colors.You can mark each color group pattern piece with a specific colored marker to make it easier. I spray the back of the pattern pieces and adhere to the shinny side of Contact Brand contact paper. Cut the pieces apart. Peel and stick your pattern pieces to the wood. The reason I like using the pattern glued to the contact paper is it will peel off easily without leaving a gummy glue residue on the wood. It also lubricates the blade and helps prevent some woods like cherry from burning when you cut. I often change my mind when positioning patterns on the wood and I can peel off easily and reapply. Always pay attention to the grain direction on the pattern. You can also use a Xyron machine which will stick your pattern to a roll of peel-able adhesive backed paper. Go to your local craft store to find them.
Tack or Pre-Glue pieces together
I use CA glue to tack the pieces together on many of my projects before gluing to the backer board. Lay the pieces in place on your pattern and glue them one piece at a time, putting them back in place on the pattern. For larger projects, divide it into a few smaller sections and glue them together.
Another good method is using 100% silicone glue (same as the clear caulk in a large tube) to tack the pieces together before final gluing. Lay the pieces on the pattern and tack the sections together with two or three small dots of silicone, taking care to follow the pattern carefully. Don’t put on too much glue, you don’t want the silicone pushing up though the seams. Let dry over night. Now when you glue your piece to the backer board with wood glue, your pieces will stay in the correct place. If you have to break it apart to adjust a piece, it will do so easily.
CA glue for sanding
several pieces at once
For a nice flowing contour, you will want to sand some pieces together as one (for example: the neck of a horse). Then you can take the pieces apart and sand each piece a bit more. My favorite method is to use Instant T Glue (CA) …it is very fast and easy. I use it 90 % of the time. Put two or three small dots of instant T Glue on one side of your two pieces. Spray with accelerator and fit back together on top of a very flat surface covered with wax paper. As you are holding it together, twist it as it dries. Twisting will prevent it from sticking to the paper. It will only take about 15 seconds to dry completely so you have to work quickly. Add on other parts one at a time. Now your piece is glued together and you can sand the contour you wish. To take the pieces apart, simply rap the pieces on a hard surface and they will break apart. If you can’t break it back into two pieces easily, you used to much glue and will have to re-cut it apart. Don’t breath the fumes as you cut. Practice on some scrap wood before you try it out. Small, fragile or delicate pieces can not be used with this method. Once you get good at using the glue method you may never make another shim.
Ebonizing Wood

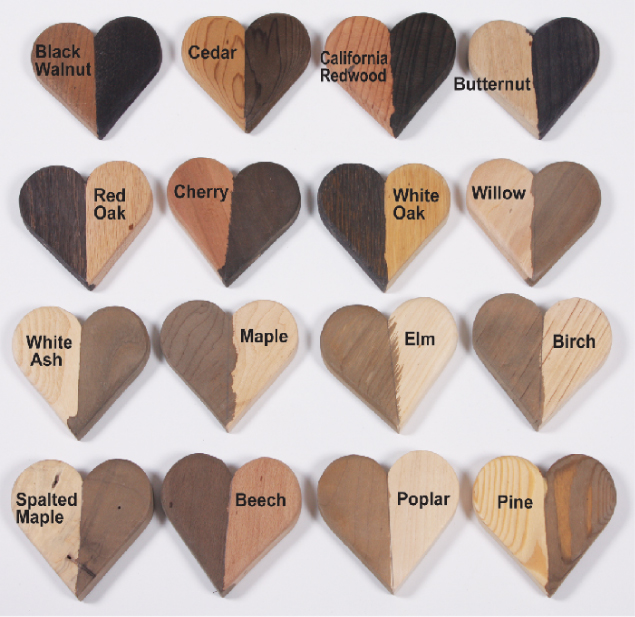
The definition of Ebonizing is “to stain black in imitation of ebony (Circa date: 1828 from the Merriam-Webster dictionary). There are several different ways to ebonize a piece of wood: staining it with black stain , using India ink, using black shoe polish, using black permanent marker or by using a mixture of common household ingredients. I like the chemical Ebonizing method of a solution of vinegar and ferric nitrate powder on 16 different species of wood. It will cause a chemical reaction that changes the color of the wood when soaked or brushed on. You can use any of these three different types of iron & Vinegar solutions ( Rusty nails, steel wool and ferric nitrate)
- Ferric Nitrate 1/2 teaspoon & 1 cup vinegar: The ferric nitrate solution works the fastest and darkest without having to soak in vinegar for an extended time. It is easy to control the intensity of the black by adding or subtracting the amount of ferric nitrate you add to the vinegar. Iron(III) nitrate, or ferric nitrate, is the chemical compound with the formula Fe(NO3)3.
- Rusty nails & 1 cup of vinegar: Let set a few hours or a day, longer it sets the more intense the color. The degree of rust on the nails effects the color as well.
- Steel Wool & 1 cup of vinegar: Cover the steel wool completely with the vinegar. Let set a few hours or a day. It also gets darker as it ages. The steel wool tends to break down and leave particles in the solution. Strain the solution before applying.
Woods which are high in tannin acid such as walnut and oak seem to work best for a very black finish. Tannin acid which is found in tea also helped to intensify the black effect on other woods. Maple and Ash will turn a light gray.